In the introductory blog about midPoint in higher education I promised that the next blog post would be about relations and organizational units. It is taking a bit longer to finalize, but hopefully it will be worth it. In the meantime, let us examine the possible uses of archetypes in midPoint.
Primary purpose of archetypes is the categorization of objects. One object can have only one archetype, but in the future, there is a plan to change that. That is why we cannot use the archetypes to distinguish between students and employees, because it would be impossible to deal with persons who are students and employees at the same time. Midpoint offers other ways to deal with that situation, but let’s focus on archetypes now.
For today’s demonstration example, we will create two archetypes for users. One will be for academic users (e.g. students, professors, researchers) and the second one for non-academic users (e.g. support staff). Usually the academic users have some additional privileges (like access to academic journals), therefore if a user fits in both categories, we will prioritize the academic one. An empty archetype doesn’t do anything, so let’s add visual change to it straight away.
<archetype oid="d2898b9b-5a31-4b7f-a971-1215f9b95b84">
    <name>Academic User</name>
    <description>Student, Teacher, Researchers, etc.</description>

    <archetypePolicy>
        <display>
            <label>Academic user</label>
            <pluralLabel>Academic users</pluralLabel>
            <icon>
                <cssClass>fa fa-graduation-cap</cssClass>
                <color>RoyalBlue</color>
            </icon>
        </display>
    </archetypePolicy>
</archetype>
<archetype oid="019eec6e-2bc2-4112-be40-57471d3a1490">
<name>Non-academic users</name>
<description>Non-academic users e.g. support staff</description>
<archetypePolicy>
<display>
<label>Non-academic user</label>
<pluralLabel>Non-academic users</pluralLabel>
<icon>
<cssClass>fa fa-user</cssClass>
<color>LimeGreen</color>
</icon>
</display>
</archetypePolicy>
</archetype>
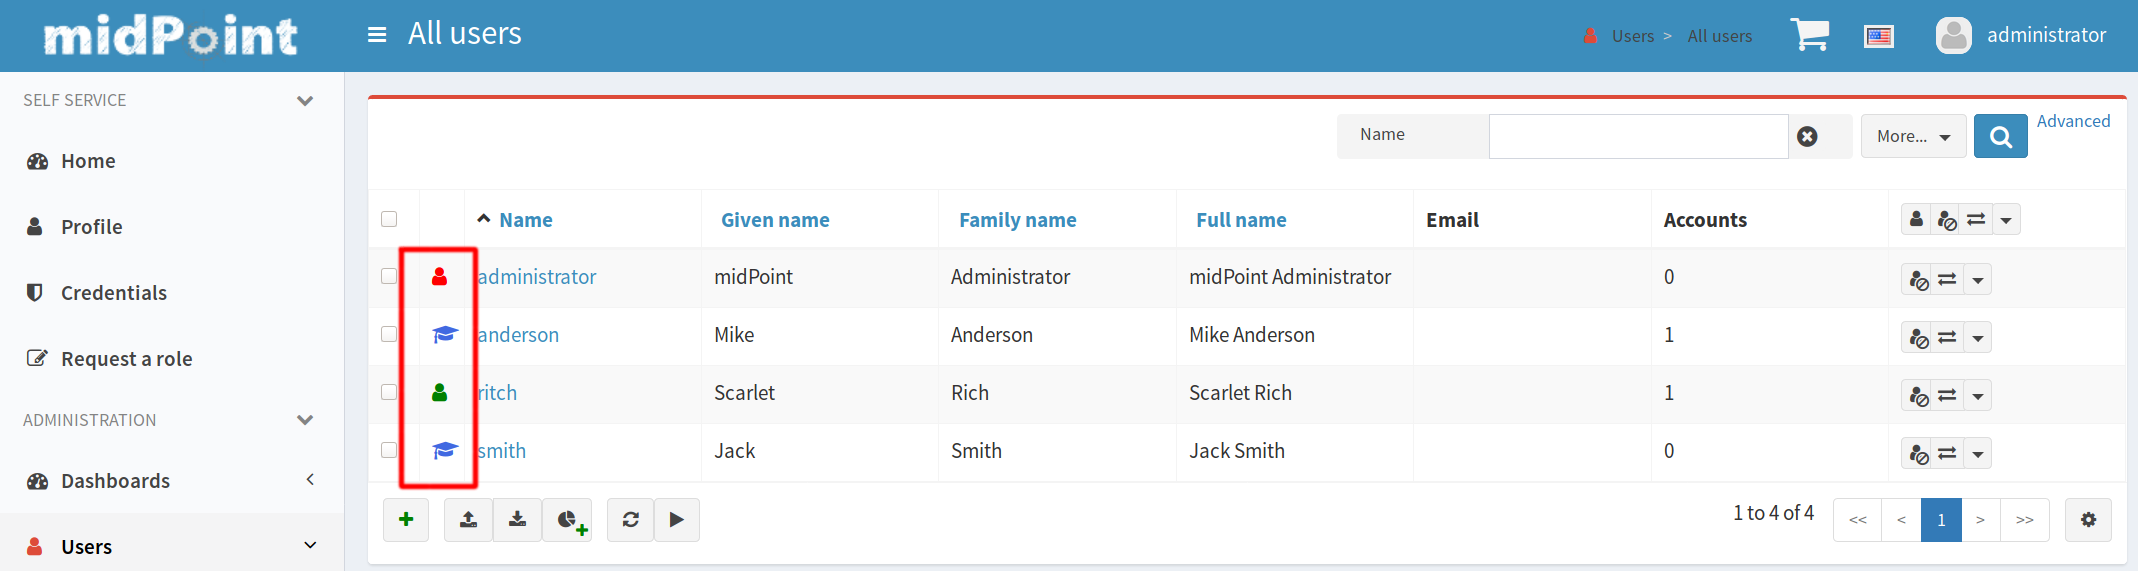
As soon as we assign the archetypes to users, we will see the change in midPoint GUI.
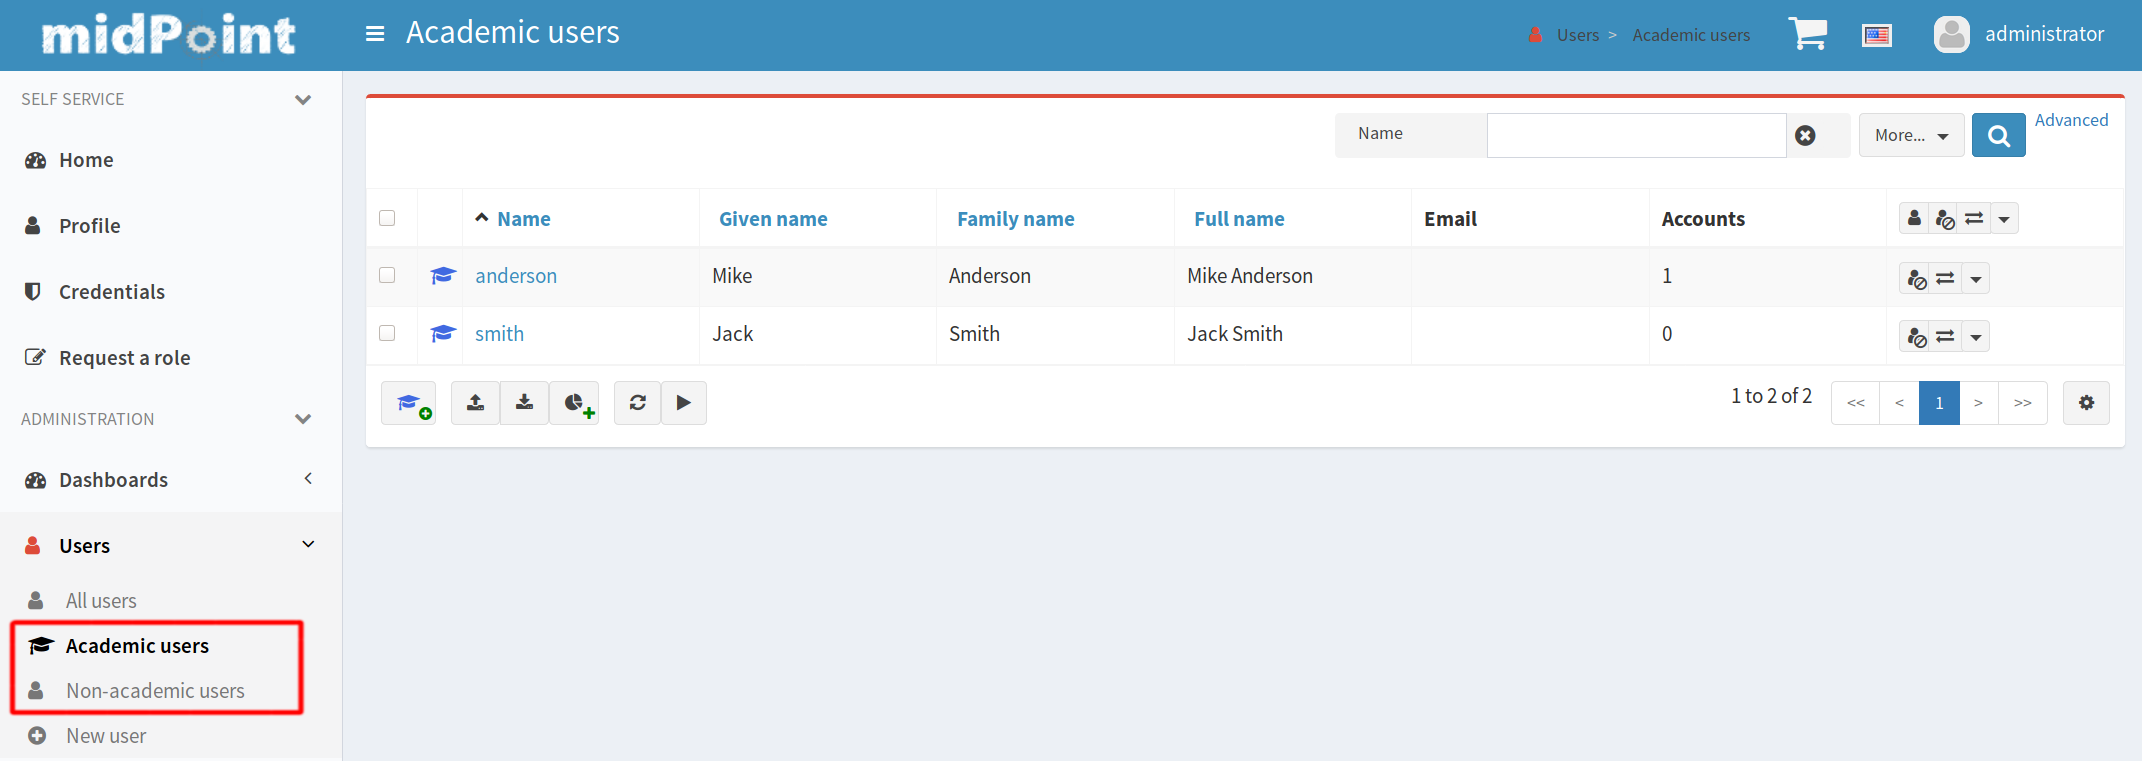
We can even add a custom collection view to midPoint GUI. To do that we have to update the adminGuiConfiguration object in the system configuration.
<adminGuiConfiguration>
    <objectCollectionViews>
        <objectCollectionView>
            <identifier>academic-users</identifier>
            <display>
                <label>Academic users</label>
            </display>
            <type>UserType</type>
            <collection>
                <collectionRef oid="d2898b9b-5a31-4b7f-a971-1215f9b95b84" type="ArchetypeType"/>
            </collection>
        </objectCollectionView>

        <objectCollectionView>
            <identifier>non-academic-users</identifier>
            <display>
                <label>Non-academic users</label>
            </display>
            <type>UserType</type>
            <collection>
                <collectionRef oid="019eec6e-2bc2-4112-be40-57471d3a1490" type="ArchetypeType"/>
            </collection>
        </objectCollectionView>
    </objectCollectionViews>
</adminGuiConfiguration>
After the change is applied, the new views are available in the menu.
Archetypes also offer another user-experience related improvement. Assignments of archetyped objects can be restricted based on custom rules. For example, we can create a role which could be assigned only to academic users.
<archetype oid="016b2ce4-7877-4633-965a-18bc9b7bc50a">
    <name>Role for academic users</name>

    <inducement>
        <description>Archetyped role can be assigned only to academic users</description>
        <assignmentRelation>
            <holderType>UserType</holderType>
            <!-- Academic user archetype -->
            <holderArchetypeRef oid="d2898b9b-5a31-4b7f-a971-1215f9b95b84" />
            <relation>org:default</relation>
        </assignmentRelation>
    </inducement>

    <assignment>
        <description>The archetype itself can be assigned only to roles</description>
        <assignmentRelation>
            <holderType>RoleType</holderType>
            <relation>org:default</relation>
        </assignmentRelation>
    </assignment>

    <archetypePolicy>
        <display>
            <label>Role for academic users</label>
            <pluralLabel>Roles for academic users</pluralLabel>
            <icon>
                <cssClass>fa fa-graduation-cap</cssClass>
                <color>SkyBlue</color>
            </icon>
        </display>
    </archetypePolicy>
</archetype>
Notice the difference between assignment, which is applied to the object itself (the archetype), and inducement, which is applied to the object with archetype assigned.
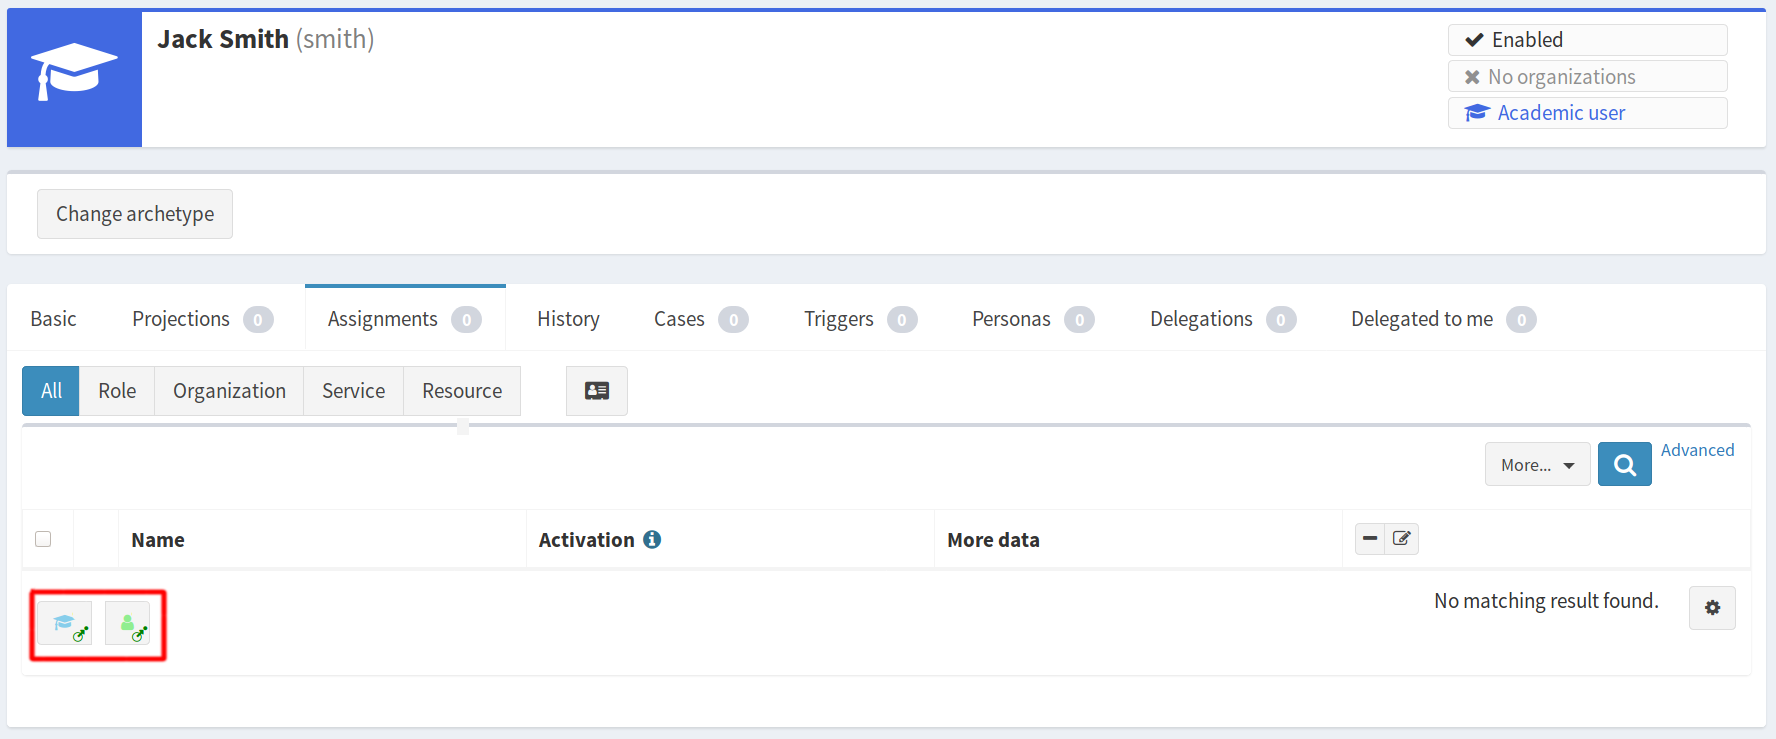
We also prepare a role for non-academic users and a role for any users in a similar way. With all the parts in place, the configuration is already visible in GUI’s assignment tab.

You can see the leftmost icon representing the role adding to academic users and the middle icon representing role adding to any user. You cannot see a button for assigning a role to non-academic users because this role cannot be applied to an academic user, who Jack Smith is (as you can see in the upper right corner). Notice that the “general” assignment button (the rightmost icon from highlighted area) is still present as it was before we have created the archetypes. To eliminate it and display only explicitly allowed relations, we have to set assignmentHolderRelationApproach to “closed”. That can be done globally or only for selected objects. We will choose the latter approach for now and apply it only to our academic users. This is how our improved Academic User Archetype looks like now:
<archetype oid="d2898b9b-5a31-4b7f-a971-1215f9b95b84">
    <name>Academic User</name>
    <description>Student, Teacher, Researchers, etc.</description>

    <assignment>
        <description>The archetype itself can be assigned only to roles</description>
        <assignmentRelation>
            <holderType>UserType</holderType>
            <relation>org:default</relation>
        </assignmentRelation>
    </assignment>

    <archetypePolicy>
        <display>
            <label>Academic user</label>
            <pluralLabel>Academic user</pluralLabel>
            <icon>
                <cssClass>fa fa-graduation-cap</cssClass>
                <color>RoyalBlue</color>
            </icon>
        </display>
        <assignmentHolderRelationApproach>closed</assignmentHolderRelationApproach>
    </archetypePolicy>

</archetype>
Note that the “general” assignment button is not there anymore and only roles for academic users and roles for any users are offered. In this configuration, you are not able to assign an org. unit to users with academic user archetype. Therefore you shouldn’t use the closed assignmentHolderRelationApproach until you have all your archetypes in place.
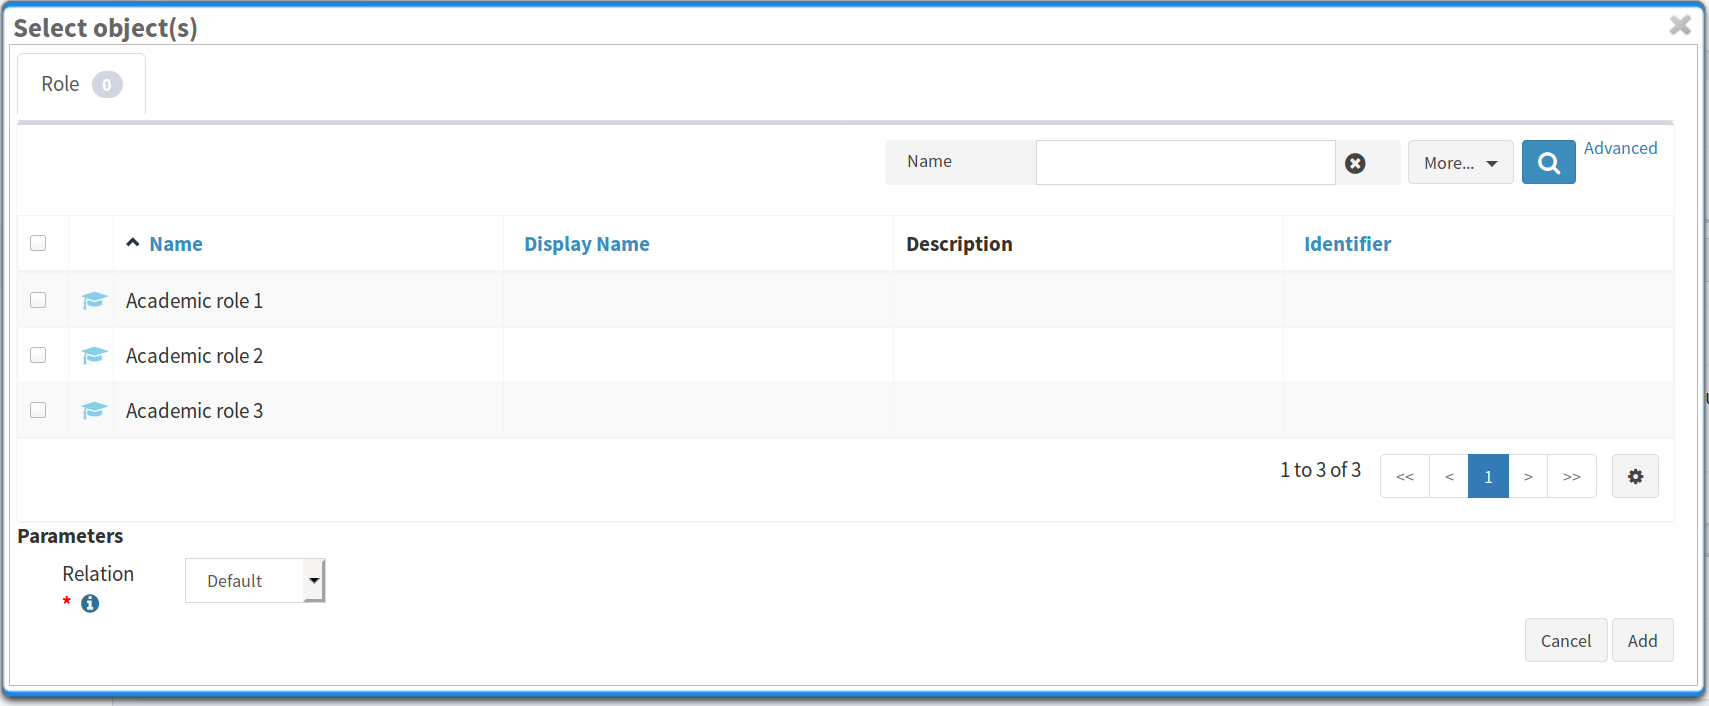
When you click on one of new assignment buttons, you will get a filtered view.
The assignment restriction feature in archetypes is quite handy. It helps midPoint administrators to keep track of which objects are meant to be assigned to each other. Just bear in mind this is only a restriction in the GUI. You can still add any relation in automatic processes. Also, if you change the archetype to another one, the existing assignments won’t be affected even though they might not be allowed by the new archetype. For enforcing such rules, midPoint has the policy rules feature.
The last feature of archetypes is that they act as an abstract role. Therefore you can use them like any other role, meaning they can induce account construction or even other roles, org. units etc.
In summary, the archetypes are a powerful feature which helps you to improve user experience in the midPoint GUI. Proper archetypes configuration will help users who only need to use the midPoint GUI and don’t need to have knowledge about the detailed configuration of roles and other objects. You can deliver a custom look and feel for them, including custom views and most importantly make sure they will assign only objects that are meant to be assigned that way.
We are welcoming feedback to this blog series. Also, we are open to suggestions for the next topics, as long as they fit the overall scope. Feel free to share your ideas in the comments, on midPoint mailing list or any other channels.
Assistance with proofreading and readability improvements provided by Keith Hazelton of Internet2 was greatly appreciated.