In its current version, midPoint can easily handle applications falling into “Internet of Things” category. In the forthcoming series of blog posts we will show how. Today let’s go through a brief introduction.
Internet of Things
Internet of Things (IoT) has been very popular in recent years. It seems to have already hit the peak of inflated expectations in 2014 and 2015, so hopefully it is on the way to become a generally useful technology. Gradually, interesting consumer-oriented products have been appearing. Popular examples are networked thermostats controlling heating and cooling (like Nest or ecobee), remotely-controlled lights (like ones from Philips or Cree) or switches or wall sockets. A broad category is home security: door locks and garage door openers, cameras, entry and movement sensors, smart bells, and so on, up to comprehensive security solutions. Some devices provide useful information about the electricity usage (like Neurio or TED), weather, or one’s physical activity. Even greater potential of these technologies is in industrial and public sectors. Of course, all that glitters is not gold. There are well-known serious questions related to security, privacy and long-term viability of current wave of consumer products. But that’s another story. Let’s concentrate on managing IoT identities via midPoint and we’ll see that we would be able to address some of these issues.
In particular, in our first scenario we’ll show how to manage sensors that send data to a public data visualization platform.
The scenario
Imagine we have a fictitious company called Smart Widgets ‘R Us. We decided to catch the fast running train – to start selling networked thermometers. (Obviously not a very bright idea these days, but let’s use it for the moment.) We designed a device and manufactured it. But what with the data? We are more hardware than web programming experts. So we decided that we will delegate data processing to an external service. We chose ThingSpeak, a popular free IoT data platform running in the cloud.
(The choice of this scenario is not quite random: I have a bunch of network-capable small devices like Arduinos, ESP8266’s and Raspberry Pi’s catching dust, along with some sensors like DS18B20 and DHT22. Having used ThingSpeak in the past, I feel quite confident we can easily set up a couple of monitoring devices. Moreover, we live in a village house with a garden and outside pantry. So it’s really useful to know the temperature history to promptly save plants or bottled fruit from freezing.)
“Before”
ThingSpeak works like this:
- A user has to register into ThingSpeak via its GUI.
- Then he can create one or more channels that will collect data from his devices. Each channel has an identifier and is protected by write and read keys. These items are generated upon channel creation by ThingSpeak.
- The user is responsible for distributing identifiers and write keys to devices and identifiers and read keys to users that want to see data generated by devices via the channels.
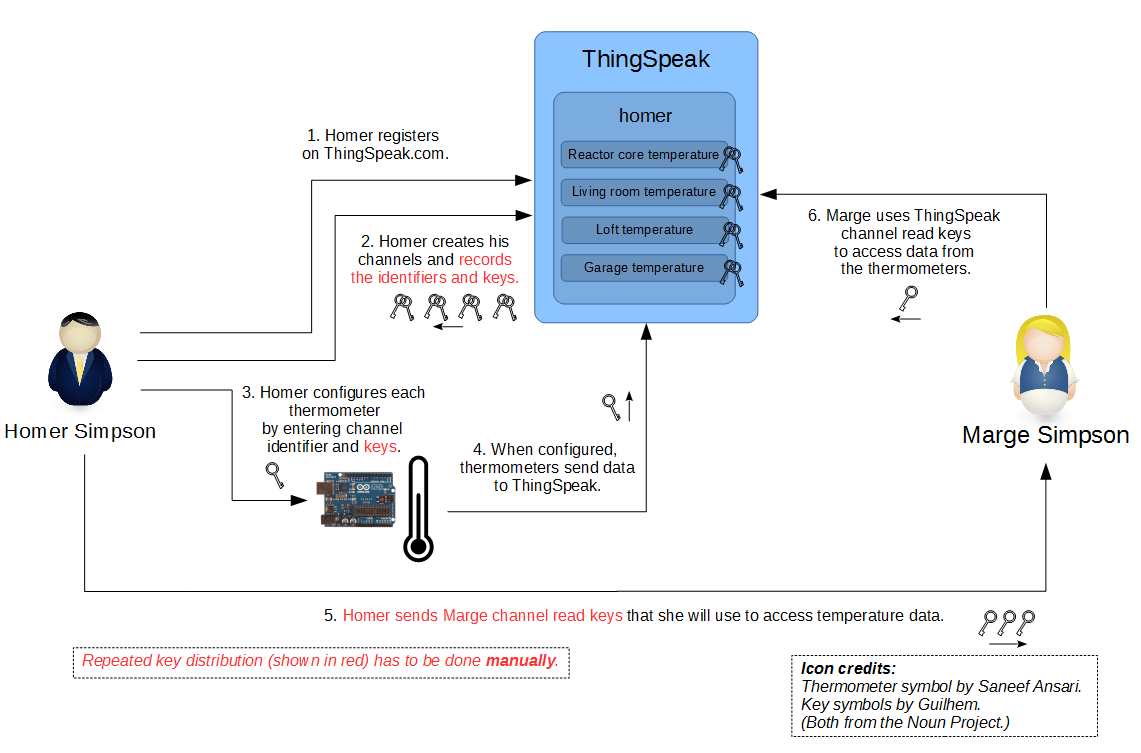
This is a lot of work, obviously. And what is worse, read and write keys should be changed regularly in order to provide a reasonable level of security. (This is shown in red.)
So we need a mechanism to automate these processes.
“After”
We will use midPoint to eliminate majority of manual processes described above. It will create ThingSpeak channels and distribute channel identifiers and read/write keys both to devices and users. What is required is:
- one-time registration of a customer both in ThingSpeak and in midPoint (the former will be eliminated),
- one-time configuration of each device in order to authenticate it against midPoint,
- definition of users in midPoint in order to define their access rights to devices.
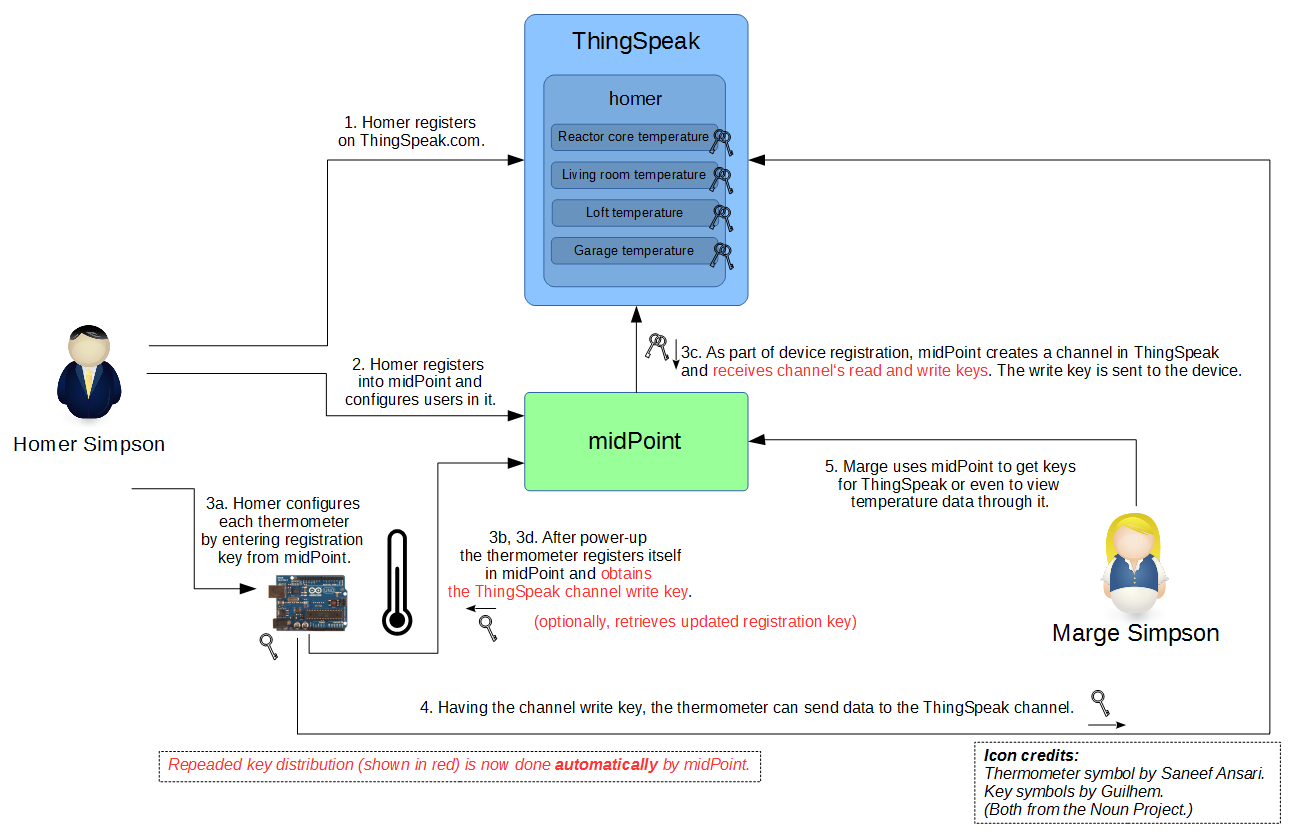
Key distribution is much simplified. Regular actions (show in red) are carried out automatically, without human intervention.
Comparison
| Action | Before | After | Comment |
|---|---|---|---|
| Initial setup | Registration into ThingSpeak | Registration into midPoint. Registration into ThingSpeak. | Registration into ThingSpeak will be eliminated later. |
| On device configuration | Manual creation of a channel in ThingSpeak. Copying channel identifier and write key (different for each device) into the device. Sending channel identifier and read key into all users that should have access to data produced by the device. | Entering registration key (the same for all customer devices) into a device. | MidPoint will ensure distribution of keys. |
| Regularly | Requesting new read/write keys in ThingSpeak. Copying write keys to devices. Sending read keys to users. | Requesting new read/write keys in ThingSpeak. | MidPoint will ensure distribution of keys. (Even requesting the keys in ThingSpeak will be eliminated later.) |
As an additional benefit, midPoint will provide structured view of individual users and their access rights to particular devices. So the administrator will not have to remember what keys he sent to what users: everything will be immediately visible in midPoint.
What next?
In following posts we’ll discuss the first scenario in more depth. First we’ll have a look at the overall architecture, including details of key distribution. Then we describe the implementation within midPoint, talking about service objects, self-registration, overlays and other interesting concepts. After that the implementation of thermometers will be discussed. If you would be interested, you could follow us also in this part and construct a couple of these devices yourself. Gradually we’ll then move to a more advanced scenario. It will feature our own instance of ThingSpeak or similar IoT platform, eliminating a couple of actions in ThingSpeak like initial user registration or requesting key change.
So let’s start. Hope you’ll enjoy our journey.